By double-clicking on a line in a list you open the editing dialog in which you can change the element in the list.
You can change the position of a column by clicking on the column header and, keeping the mouse key pressed, dragging it to the new position.
With the key combination 'Ctrl' + 'right mouse button' you access a menu in the list with the following functions:
With the 'Set as left column' function you set a previously selected column at the beginning of the list.
Column selection: a dialog is displayed in which available columns are displayed on the left and the selected columns are displayed on the right. You can move selected elements from one window to the other using the arrow keys in the middle. The columns displayed in the 'selected columns' window are displayed in the list.
Column alignment: the values in the columns can be aligned 'flush left', 'centred' or 'flush right'.
Column interpretation: here you define whether the value in a column is a 'number' or 'standard' combination of characters.
Normalise table: Adjusts the width of the columns to the width of the largest elements (including heading) of the respective column.
Copying a cell (clipboard function): With this the contents of the selected cell are copied on the clipboard. With 'Ctrl' +'V' you can insert the text in another place e.g. in the input box of a selection mask. - On a mouse with three buttons the middle button can be used to copy the contents of a cell (paste on clipboard), providing the middle mouse button is configured for this purpose. Use the right mouse button to insert text from the clipboard e.g. into the input box of a selection dialog.
Note: In columns in which there may be an icon, or if the contents are compiled from several sources, the column functions do not work. The columns involved are e.g. 'Type' and 'Event info' in the event list.
Exporting list with data: With this function you export a list in CSV format. The data are then available for further processing e.g. with MS Excel.
Carefully move the mouse cursor over the separating line between two columns. The mouse cursor changes to a double arrow. Press the left mouse key and move the mouse to the left or right to change the width of the column.
In order to sort a list according to the criteria of one of the columns, you left click on to the column header. A further click determines whether the list is to be sorted in an ascending or descending order. The arrow next to the header indicates assortment in an ascending or descending order.
In order to sort a list in multiple columns, press the 'Ctrl' key and left click on the heading of the additional column. Next to the triangle indicating the direction of sorting, a number ![]() will now be displayed indicating the order of sorting. The direction of sorting of the additional columns is changed with the '
Ctrl' key and the left mould button. With 'Ctrl' and the right mouse button you reset the selection. You can use up to 9 columns to sort a list.
will now be displayed indicating the order of sorting. The direction of sorting of the additional columns is changed with the '
Ctrl' key and the left mould button. With 'Ctrl' and the right mouse button you reset the selection. You can use up to 9 columns to sort a list.
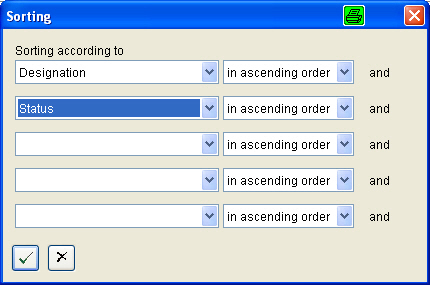
In the context menu of the list you will find the 'Sorting' dialog. Here up to five columns can be selected and the direction of sorting, ascending or descending specified.
You can save the changes you have made via the 'module' menu and 'save settings' option. The changes are valid only for the registered user.
In the mask for selecting criteria for the list of a module all the sizes are displayed which restrict the number of displayed list elements.
The place holders '*', for a character group, and '?', for a single character, are supported.
![]() Open selection mask
Open selection mask
![]() A selection has been made. This symbol (icon) is displayed as soon as a selection has been made. By clicking onto the symbol,
the selection is reset to the default setting. If the selection mask is pushed together, the icon symbolises that a selection has been made.
A selection has been made. This symbol (icon) is displayed as soon as a selection has been made. By clicking onto the symbol,
the selection is reset to the default setting. If the selection mask is pushed together, the icon symbolises that a selection has been made.
![]() Close selection mask
Close selection mask
![]() Apply selected options to the displayed list.
Apply selected options to the displayed list.