Configuration and administration of ALS
Basic configuration
Proceed in the following order to configure the ALS system :
Define:
1. machine hall,
2. machine group,
3. machines and
4. working calendar.
5. Assign working calendar to machines.
6. Configure the 'machine hall'.
7. Define workers and users.
Tips and hints:
- Machine halls and machine groups must first be existent before you can configure machines in ALS. ARBURG injection moulding machines are connected to the ALS via an 'Ethernet' network. Each machine has a unique designation via its own IP-address which must be determined before a machine is configured.
- The working calendar is the pre-requirement for a shift-related evaluation of the recorded events in the production. If no working calendar is defined, a 24-hour work shift will be assumed.
- Before users are configured, all activities in the ALS will be assigned to the Administrator. The 'ADMIN' user should therefore only be used when fundamental changes are made to the configuration of ALS. You are advised to define a second user with administration authorities, so that you have a further possibility of making changes in the system should you, for example, forget the 'ADMIN' password.
- The specifications which the 'ADMIN' user makes for the lay-out of the 'machine hall' and for the various lists in the 'ALS Client' are taken over for new users!
- You are advised to define a second user with administration authorities, so that you have a further possibility of making changes in the system should you, for example, forget the 'ADMIN' password.
- Make use of the facility of defining user groups with various access rights in order to limit the circle of users for certain activities.
Halls / groups / machines
You must first configure machine halls before the ALS Client can display machines. To do this, open the 'Master data' module and call up the function '
Halls/groups'. The window now displayed is divided into two parts. In the upper section you will find the functions for creating the machine halls. In the lower section are the functions for creating
machine groups. Creating machine groups facilitates the selection of machines which, e.g. are part of a production line.
 |
With this button you open the dialog for creating a machine hall. For this purpose you only need to input a 'Hall name'. The
number you input at 'Order' determines at which position the designation of the machine hall is displayed in the selection of the 'Machine hall' module.
An individual diagram of each 'Hall', corresponding to the actual geometry of the hall, can be stored in the master data. This facilitates the allocation of the machine symbols to the actual machines.
Input the name of the graphic file (e.g. PROD1.jpg) which contains the picture. Place the file in the directory '..\DATA\PICTURE'. The file must be generated in JPEG format and should have a maximum size of 800 * 600 pixels.
|
|
In the dialog for creating a machine group it is sufficient to input a 'Group name'. One and the same machine can be allocated to several machine groups, so
it can be purposeful to define e.g. groups for production lines and groups for machine sizes. Note that when the groups are displayed, they are sorted according to the name of the group! |
|
Next, change to the 'Machine' function in the 'Master data' module. Open the dialog 'Add new machine' and input the 'Machine name'. Select 'Machine manufacturer', 'Model' and 'Controller' and assign the machine to a 'Hall' as well as to one or more groups. If your machine's controller version is not included the list of controllers, select the next smallest version. If you do not find your machine at all in the given options, please contact ' ARBURG ALS Service'. |
| |
If you require further information on the machines, you can add this in the 'Edit machines' dialog. |
 |
The machines are linked to the 'ALS server' by a Network. The 'IP address' identifies the machine in this network. Ask your 'Network administrator' for the permissible 'IP addresses'.
This address must also be configured on the Machine communication nodes by the ALS administrator! |
| |
The machines are represented by a standard symbol in the machine hall. If you want to use individual symbols, you can assign a dedicated 'symbol data file' to each machine in the Master data. |
 |
When transmitting programs from the machines to the ALS, up to 10 screen panels can be included and saved together with the program. State which pages are to be transmitted for each machine. |
 |
Input the date of the initial setting into operation of the machine in the dialog 'Edit machine'. This date is used for calculating the dates for the execution of maintenance orders. Further information can also be stored in the 'Edit machine' menu. |
 |
In the dialog 'Adding cycles and operating hours to the history of the machine' you input the current counter readings for cycles and operating hours of the machine. In ARBURG controllers of the type SELOGICA, this information can be taken from the screen panel 'Machine parameters - Display'.
The inputs made in this dialog are used to determine the times/dates when maintenance orders are to be carried out.
The icon for this dialog is only displayed when the 'ADMIN' user is logged on to the ALS. |
 |
With ARBURG controllers of the type SELOGICA from version 3.090 onwards, texts describing error causes can be programmed
on a machine from the ALS. To do this, go to the 'Master data' and 'cause of error' and click on the 'Transfer cause of error to machine'
function. A list of all machines is displayed on which it is possible to program the cause of error text from the ALS. Select the required machines and start the transfer process by clicking on the 'OK'
button. |
(for additional information see ' Hall/group ' and ' Machines ')
Configuration of calendar
The factory calendar is the basis of all time-related evaluations and calculations in the ALS. In the plan table the time bar is displayed in accordance with the working hours specified in the calendar. The calendar is used as a basis for all shift and day-related evaluations. With the 'Calendar' function in the 'Master data' menu you can:
Open the 'Master data' module and start the 'Calendar' dialog. Select the 'Day models' page.
|
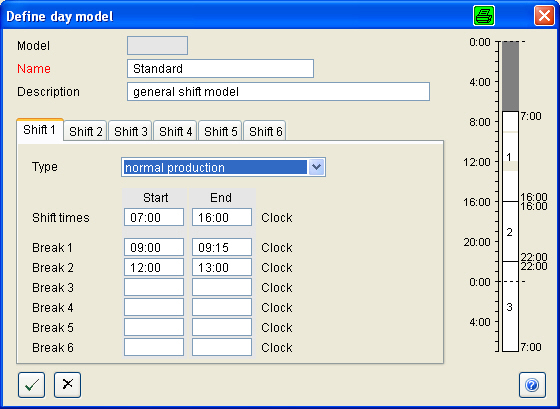
Open the 'Define day model' dialog. Select the ' Name' of the day model so that its purpose can be clearly seen from it. Input a 'Start of' and 'End of' time for each shift and a time for the breaks. Your inputs are graphically displayed on the right hand side of the diagram. Please note that overlapping shifts are not permissible. Frequent deviations from the standard day model (e.g. Saturday model', 'Bank Holiday model' can be defined in a separate day model. Short-term deviations from the standard models can be documented in the '
Deviations' dialog.
|
|
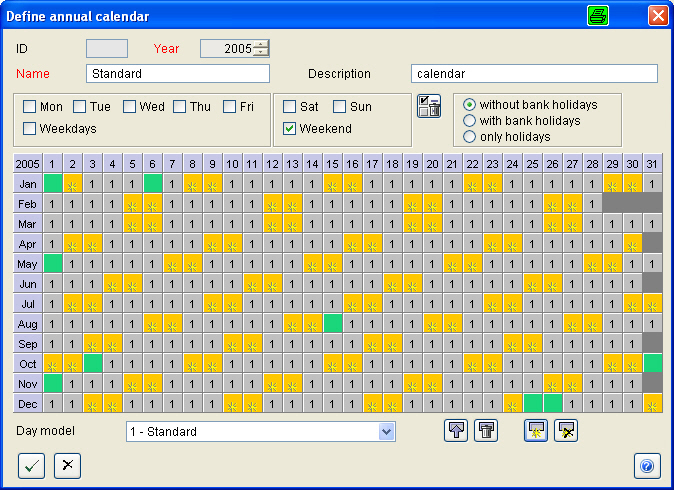
Now change to the 'Annual calendar' page and open the 'Define annual calendar' dialog.
|
| |
Give your annual calendar a self-explanatory 'Name'.
|
 |
Click into the box next to 'Weekdays'. Select the required 'day model' from the options next to ' Day model' and assign it to the weekdays.
|
 |
Proceed in the same way with the days of the weekend. Assign the attribute 'non-working day' to the selected days.
|
 |
Save the annual calendar.
|
 |
Your annual calendar can now be assigned to the machines. Select the calendar from the list and click on the button: '
Assign annual calendar'. Select the machines from the displayed dialog.
|
|
Confirm your selection with the 'OK' button.
|
The configuration of the factory calendar is now ready.
(see ' Calendar ')
Set up of machine hall
 The settings undertaken by the Administrator are used as a basis for the configurations made for each newly defined ALS user.
Open the 'Machine hall' module and select a hall. Activate the 'edit mode' in the 'Extras' menu. Move the machine symbols to the required positions with suppressed left mouse click. You can adjust the size of the symbols via the icons with the 'plus' and 'minus' signs. Alternatively you can use the pop-up menu function which you access by right-clicking on the machine symbol. You can select several machines at once by drawing the suppressed left mouse over the required machines. The functions in the icon bar are now effective for all selected machines.
Having completed your changes, click on the 'Save settings' button in the ' Module' menu and quit the editing mode.
User administration
Only members of the 'Administrators' user group should have access to the 'User' function. Here you can
-
create user groups,
-
define workers and
-
ALS users
To set up the user administration, decide first which group of workers are required for which ALS jobs and define user groups accordingly. In the last step, input the required data for each worker, transfer this to the 'ALS users' and assign them to the respective user group.
Note: The fields marked 'red' in the user administration are compulsory inputs.
User groups
With user groups you control the authorisations assigned to each user.In the list of users the following functions are available:
When adding a new user group, you first enter the 'Group name'. You can also enter a 'description' text and up to 5 lines of additional information for each group. When you click on the OK button
to quit the dialog, the 'authorisations' dialog is displayed. Here you select the function- and machine-related authorisations valid for this group. This means you can limit the authorisations in such a way, that users working on a certain
production line only have access to the data on these machines.
The machine-related authorisations have no influence on the visibility of the machines in the machine hall or other non-critical functions (e.g. status display).
Functions on which the machine-related authorisations have an influence:
|
Modul
|
Function |
| Machine hall |
Upload program from machine. |
| Orders on machine |
| Order administration |
Order download to machine. |
| Program administration |
Program download to machine. |
| QS |
QS start |
| QS edit |
| QS stop |
Note:
Only members of the group of 'Administrators'' should be given access to the user administration.
If you have specified that the users must use a password, by activating the 'Password required' function, the users can change the initial password you give them to an individual one only they know, via the "Change password" function
in the "File" menu.
When a user group is erased, all users in this group are also erased. Therefore, before erasing a user group, check which users are members of this group and whether they are still required.
Worker / Users
You will find the lists of workers and users on the 'Workers/users' notebook page. Workers are thus not automatically ALS users.
To define a new worker, open the 'Add worker' dialog. Here you input details such as worker type, surname and first name. Other optional information can also be stored here.
 |
To create a user, first select a worker and then activate the function 'generate user from worker'.
In the dialog which is then displayed you assign a 'user name' and a 'user group' to the user. The name of the worker and the name of the user need not be identical. The user name can be, e.g. a personnel number or user ID used
in the company-internal computer system. Specify 'Password required' and input a generally valid password (e.g. 'ALS'). Disclose this password to the new user and tell him to change it immediately after initial log-on. He
can do this using the "File" menu in the ALS Client.
|
Hints:
Remember when inputting a password that this system recognises capitalisation!
If a user forgets his password, only the 'ADMIN' user can reset the existing password. This means the old password must first be deleted by 'ADMIN' after which the user can input a new password.
Extended configuration
If you are using the Maintenance module of the ALS to administrate maintenance orders for machines and moulds, your work will be simplified if you specify maintenance categories
and templates for the maintenance orders.
Templates should also be created for the free texts in the History module of machines and moulds so that certain procedures are always recorded in the same way.
Maintenance categories and templates
To define a maintenance category, open the Maintenance module in the ALS Client and click on the
'Maintenance categories' tab.
|
Start the dialog for adding a new 'Maintenance category'. Input a self-explanatory designation for the category, select the category and specify in a description text in which cases this category
is to be applied. This description text will then appear in the description of the templates you assign to the category. |
|
To define the templates, go to the 'Maintenance templates' page. Input a designation for the template, e.g. 'Storage container for central lubrication'
and select the required category, (here 'Machine'). Input a maintenance interval (time between inspections) and the duration of the maintenance work. The category 'Lubrication' would be fitting for the above mentioned example.
To the description you can add information e.g. that this template applies to toggle machines and the specifications of the controller are to be observed. |
When you create maintenance orders from a template, you can change the details to match the individual production resource. If you have several similar resources, the maintenance order can be copied and adapted.
Templates for free texts

 |
When you input information in the History of machines or moulds and after completing maintenance jobs, free-text input fields are offered in which you can deposit more detailed information. For such cases as the recording of the initial setting
into operation of a machine, or mould trials, or when endorsing recurring maintenance work you will undoubtedly require the same details each time. For this purpose a function is available to transform the text you input in this input box into
a template and use it as a standard form. These templates are only displayed in the same connection as for which they were originally created. |