The 'Machine' administration should only be used by the ALS system administrator, because the changes made here have far-reaching consequences.
In the menu list the option 'Automatic data transfer after defining, changing or deleting' ![]() is activated as a default. This
means that all the changes you undertake are immediately taken over in the whole system. As the system calibration can take a while we recommend that you first undertake all the required changes before starting this operation. For this purpose, deactivate
the 'Automatic data acceptance' function, make all necessary changes and the press the button 'Accept data'
is activated as a default. This
means that all the changes you undertake are immediately taken over in the whole system. As the system calibration can take a while we recommend that you first undertake all the required changes before starting this operation. For this purpose, deactivate
the 'Automatic data acceptance' function, make all necessary changes and the press the button 'Accept data' ![]() .
.
The dialog for defining a machine contains the following boxes:
|
Name |
Designation under which the machine is administrated in ALS. The 'Name' is displayed in the machine hall. |
|
Description |
Short text containing further details pertaining to the machine. |
|
Manufacturer |
The selection of the machine manufacturer is the pre-condition for the display of the data in the fields 'Model’ and 'Controller’. |
|
Model |
Machine model. e.g. 'ARBURG ALLROUNDER S' |
|
Controller |
Designation of machine control system. e.g. 'SELOGICA'. |
|
Hall |
Production area in which the machine stands. |
|
Group |
Machine group, to which the machine has been allocated. This can be e.g. a group of machines of the same size or the machines belonging to one production line/cell. A machine can be assigned to several groups. The groupings are beneficial in the selection tree of the machine hall. |
|
Serial number |
Serial number of the machine. ARBURG machines are identified additionally by their serial number in ALS. |
|
IP address |
Unique network address, through which the ALS communicates with the machine. |
The boxes marked 'red' contain 'compulsory' information. The specifications made here are sufficient to define a standard machine. Further details are made under 'Change machine'.
The newly defined machines are all displayed at the top left of the machine hall. You place the machine symbols in the 'hall' using the Editor of the machine hall. When several machines are defined at the same time the machine symbols appear in a vertical row.
In the dialog 'Change machine' you have access to all configuration parameters of the machines.
When the name of a machine is changed, this applies to all data associated with this machine, such as programs and logged data. If the (software) version of the control system used on this machine is updated, you should check under 'Controller' whether a version is listed here which comes near to the updated version. For example, if the controller has been updated from Version 3.030 to Version 3.070, then you can select SELOGICA 3.060.
Remember that some changes which you undertook in the last configuration will be lost when the control system is updated.
![]() On the 'General info' page you can change the assignment of the hall and group. A machine can be assigned to several groups. Here you can also assign
a special symbol for the machine hall to a machine by means of a 'Symbol file'. This file must be available in 'GIF Compuserve' format and with a transparent background. Remember that all white (255,255,255) surfaces will be coloured
with the colours indicating the status of the machine.
On the 'General info' page you can change the assignment of the hall and group. A machine can be assigned to several groups. Here you can also assign
a special symbol for the machine hall to a machine by means of a 'Symbol file'. This file must be available in 'GIF Compuserve' format and with a transparent background. Remember that all white (255,255,255) surfaces will be coloured
with the colours indicating the status of the machine.
 P0000001.gif
  P0000002.gif
  P0000003.gif
  P0000004.gif
In 'Thumbnail' you specify a file which contains a symbol displayed for the machine in the selection tree of the machine hall under 'Production means'. The ALS supports the graphic formats 'JPG JPEG Interchange' and 'GIF Compuserve'. The symbol for the 'Thumbnail' is greatly reduced in size. This should be taken into consideration when creating the symbol. The files must be located in the sub-directory 'DATA\PICTURE' .
With 'Size/category' you have the possibility of setting up criteria by which you determine which moulds fit on which machine. You can use the number you have
input here for example to indicate that moulds which have a value in the 'machine size' feature which is smaller or equal to that of the machine can be used on this machine.
If you mainly produce parts with inserts on a machine, as for
example on rotary table machines, you can select the entry 'semi-automatic' at 'Type of production' so that the messages from the machine are correctly interpreted.
The specification '
Initial setting into operation' is important for the Maintenance orders. Here the date of the of the initial setting into operation is
used as a basis for calculating the deadlines for the scheduling of maintenance orders.
![]() On the 'DNC' page you will find all entries relating to the program transfer.
On the 'DNC' page you will find all entries relating to the program transfer.
|
Category |
Controller |
|
1 |
ARBURG ALLROUNDER 170 CMD |
|
2 |
ARBURG ALLROUNDER 305 ECO |
|
3 |
ARBURG ALLROUNDER HYDRONICA D |
|
10 |
ARBURG ALLROUNDER MULTRONICA |
|
20 |
ARBURG ALLROUNDER DIALOGICA 3.x |
|
30 |
ARBURG ALLROUNDER DIALOGICA 4.x |
|
40 |
ARBURG ALLROUNDER DIALOGICA 5.x |
|
50 |
ARBURG ALLROUNDER SELOGICA 1.x |
|
70 |
ARBURG ALLROUNDER SELOGICA 2.x |
|
70 |
ARBURG ALLROUNDER SELOGICA 3.x |
|
70 |
ARBURG ALLROUNDER SELOGICA 3.060 |
Only programs of machines within the same program category can be exchanged. A further differentiation within a program category can be introduced via the compatibility. A program from a machine with a compatibility of e.g. 0 can be transferred to a machine with a compatibility of 10 in the same category, but not vice versa. The DNC capability describes the functionality of the controller with regard to transmission. Here you undertake no changes. If you have activated the option 'Lock', a program transfer is no longer possible for this machine.
![]() Under 'Capabilities' you will find information on the behaviour of the machine during order processing, on the
extension stages of the machine, special control functions and on how ALS behaves towards the machine. No changes should be undertaken in the first three capabilities
without consulting the 'ARBURG ALS Service' team. With the ALS capability, the points related to the program transfer are important.
Under 'Capabilities' you will find information on the behaviour of the machine during order processing, on the
extension stages of the machine, special control functions and on how ALS behaves towards the machine. No changes should be undertaken in the first three capabilities
without consulting the 'ARBURG ALS Service' team. With the ALS capability, the points related to the program transfer are important.
Download only for programs which originate from this machine. – Only programs originating from this machine can be transferred back to this machine.
Download of the latest program within the DNC category. – If a program with the order data is to be transferred to a machine, or if a program is requested from a machine, the latest version of the program with the specified designation and of the category suitable for the machine is transferred.
The program automatically receives production status with an upload. – A program, which is transferred from this machine to the ALS automatically receives the status 'production program', whereby an existing program with the same designation receives the 'Archive' status.
On communication parameters you only change the IP address. All other boxes should only be changed after prior consultation with the 'ARBURG ALS Support' team.
Attention! Changing the IP address does not mean that the address is also changed in the machine (communication node). If you change the IP address here you must change it on the machine as well, otherwise communication with the machine will not be possible when you next start ALS.
![]() Machines, which are linked through 'ARBURG I/O', require configuration data for their 'connection'.
This data includes the 'IP-address of the field bus node', the 'number of the module', to which the cables are connected, and the 'terminal numbers',
to which certain signals are to be connected. Select one of the following 'modes' in accordance with the capabilities of the connected controller:
Machines, which are linked through 'ARBURG I/O', require configuration data for their 'connection'.
This data includes the 'IP-address of the field bus node', the 'number of the module', to which the cables are connected, and the 'terminal numbers',
to which certain signals are to be connected. Select one of the following 'modes' in accordance with the capabilities of the connected controller:
status and cycle recording
only cycle recording (Status is manually recorded)
only cycle recording (Status is automatically recorded)
only status recording.
![]() The machine data contain the mechanical characteristics of the machine and the information of the language used on the
machine. If a machine has more than one injection unit (multi-component machine), you input the ‘number of injection units’ here. The 'international machine size' is comprised of two figures e.g. '600-100'. The first figure represents the clamping force [kN], the
second is the product of maximum dosage volume [cm3] and the maximum injection pressure [kbar].
The machine data contain the mechanical characteristics of the machine and the information of the language used on the
machine. If a machine has more than one injection unit (multi-component machine), you input the ‘number of injection units’ here. The 'international machine size' is comprised of two figures e.g. '600-100'. The first figure represents the clamping force [kN], the
second is the product of maximum dosage volume [cm3] and the maximum injection pressure [kbar].
![]() On the 'Picture' page you have the possibility of creating a link to a picture of the machine. The picture formats 'GIF',
'JPEG', 'PNG' and 'BMP' are supported. In order for all ALS clients to have access to this picture, it must be stored on a server to which all clients have access. In the machine list,
machines with a picture are marked with an icon in the 'external documents'' column. The link to the picture is also shown in the document administration with the remark 'Master data picture'.
On the 'Picture' page you have the possibility of creating a link to a picture of the machine. The picture formats 'GIF',
'JPEG', 'PNG' and 'BMP' are supported. In order for all ALS clients to have access to this picture, it must be stored on a server to which all clients have access. In the machine list,
machines with a picture are marked with an icon in the 'external documents'' column. The link to the picture is also shown in the document administration with the remark 'Master data picture'.
The machine can be deleted from a machine hall but the machine data remain intact.
Caution: Before you can delete a machine you must end all active orders on the machine. I.e. you delete the order identifiers (on both machine levels) and wait until the orders receive the 'finished'status in ALS.
You assign one or more machines to a year calendar by selecting the machine and pressing the button 'Assign to year calendar'. Alternatively you can also reach this function via the right hand mouse button. Select the required year calendar from the list titled 'Assign year calendar' and then click on OK to leave the list. In the 'Calendar' column the assigned calendar is identified by its Calendar-no.
The valid annual calendar of the selected machine is displayed with the deviations valid for this machine.
Symbols used in the calendar:
![]() Working day to which the day model '1' is assigned.
Working day to which the day model '1' is assigned.
![]() Bank holiday to which no day model has been assigned but which is not marked as a non-working day, i.e. it is a valid 24 hour
day model!
Bank holiday to which no day model has been assigned but which is not marked as a non-working day, i.e. it is a valid 24 hour
day model!
![]() Day of a weekend which is marked as a non-working day.
Day of a weekend which is marked as a non-working day.
![]() Day on which the deviating day model '2' has been assigned to the selected machine.
Day on which the deviating day model '2' has been assigned to the selected machine.
The headings of the screen pages available for the selected machine are displayed. A maximum of 10 pages can be selected. When a program is transferred to ALS, the selected screen pages are also transferred to ALS and archived there together with the program.
Complications can arise with the selection of the pages because the page numbering depends upon the controller version. You therefore have the possibility of inputting the controller version of the selected machine in the dialog 'configure screen panels'. You can input a word or term in the input box via the 'Search' and 'Continue search' functions, to search for a panel. You administrate the range of the 'selected screen panels' with the arrow buttons.
![]() The screen pages can only be configured when the machine is switched on!
The screen pages can only be configured when the machine is switched on!
Events such as purchase, maintenance, repair, conversion etc. are documented in the 'machine history'. Here you input the date of the event, the operating hours of the machine, text in up to 5 'Info fields' and in a free text area.
(see 'History')
You can store various kinds of Documents, such as drawings, maintenance schedules etc. for each machine.
The list of machines is printed.
When defining a new machine in the ALS, you must input the current level of completed cycles and operating hours. There is a similar dialog for the Moulds!
When you book operating hours subsequently to those already counted on a machine, please ensure that the amount you want to book is added to the 'actual count' already on the machine. The hours counted in ALS will differ from those on the machine, because the machine counts the operating hours of the pump, which ALS cannot recognise. ALS logs the time in which the machine is switched on.
On ARBURG ALLROUNDERs with SELOGICA controller call up the 'Machine displays - parameters' parameter panel with the A-key. Here you will find parameter 'f9002 machine cycles' and the operating hour counters 'f9000 pump' and 't9001 operating hours in automatic'. Enter the value at 't9001' in 'Operating hours in automatic' and enter the difference of 't9000' minus 't9001' at 'Operating hours in manual'.
![]() The dialog must only be carried out once for each production resource. Only the 'ADMIN' user has access to this dialog!
The dialog must only be carried out once for each production resource. Only the 'ADMIN' user has access to this dialog!
The 'Machine configuration' can only be accessed by the ALS 'Administrator'. All 'Machine communication nodes' are displayed in the list which is located in the same sub-network as the computer with which you are connected to the ALS.
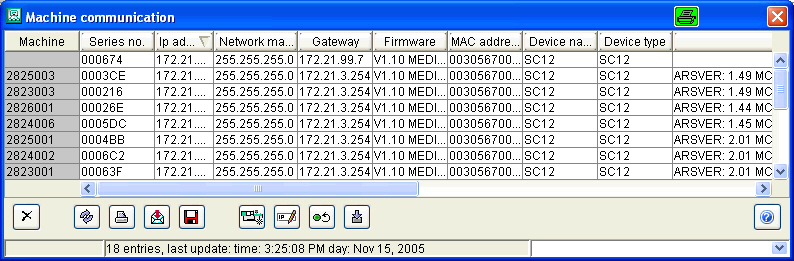
If you want to connect more than one machine to the ALS you can connect one machine after the other to the PC (machine) network and proceed in the following steps for each machine:
| 1. | Connect the new machine to the network and update |
| 2. | The machine is not entered in the 'Machine' column but in the 'IP address' column it has the value '1.1.1.1'. |
| 3. | Select the entry from the list, open the 'IP configuration' |
| 4. | In the next step you select the node from the list and open the dialog 'Add new machine' |
The machine should now be displayed in the 'Machine hall' in colour. If this is not the case, the node must be 're-booted' ![]() .
.
If one of your machines is to be updated with a new controller software, or if a software update is due on a machine communication node you will be informed accordingly by the 'ALS Service'. For the update,
use the dialog 'Transfer software' ![]() , to supply the nodes selected from the list with the new software.
, to supply the nodes selected from the list with the new software.
Caution: with the option 'New installation' all data files on the node will be overwritten, however with 'Update' only the executable file will be transferred. Select the software to be transferred in the 'Software' window.
Note: If you call up the dialog 'IP configuration' for a machine which has been configured in ALS and if the option 'Update ALS master data' is activated, the changed IP address will be taken over in the master data.