In the item administration you have access to the item-related data used in the ALS.
If you right click on an entry in the list a pop-up menu is displayed with the functions 'Info', 'Change status', 'Change', 'Copy' and 'Delete'.
The list can be pre-sorted according to 'Item', 'Description' and 'Status'.
![]()
![]()
![]()
![]()
![]()
![]()
![]()
You access the dialogs to 'Add', 'Change', 'Info', 'Change status', 'Copy' and 'Delete' items or to 'Print list' via the icons located under the list.
Before you print out the list you certain configurations are to be made.
For each item, a ![]() History'
and a
History'
and a ![]() 'Document administration' function are available.
'Document administration' function are available.
All fields marked red in the dialog 'Add item' must be input. Before you add a new item, you should have defined the respective 'Mould' in the Master data.
With 'Type' you specify whether the item is a 'Finished product' or a 'Semi-finished product'. 'Semi-finished products' are displayed under 'Materials' and can be set as a condition for a 'Finished product' in the schedule. For this purpose the unit 'pieces per part' is available at 'Quantity' in the list of 'Materials'.
'Mould' and 'program' can be selected from available data. The designation of the program can also be entered directly. The 'Add mould' dialog is displayed for defining a new mould.
If you have more than one mould for an item, you must define a separate item for each mould. You will find information on the number of cavities in the mould data. With 'Program' the name of the machine program (set-up data record) is meant, which is to be used for the production of the item. The machine program need not (yet) exist in order to define an item but you should know its designation.
The information in 'Cycle time' is suggested as nominal cycle time in the order data which you generate from the item data.
'Set-up' and 'Strip-down' duration can be input in hours and minutes [hh:mm]. Decimal numbers are converted into hours and minutes. In the 'Staff ratio' you enter in [%], during how much of this time one or more members of staff must be present at the machine. 100% stands for one worker, 200% for two workers.
If you input information in the fields 'Machine group' and/or 'Machine', the item can only be scheduled on a machine in this group or on the specified machine.
For the information you input on the material you have various options. The only pre-requirement is that you have defined the material data.
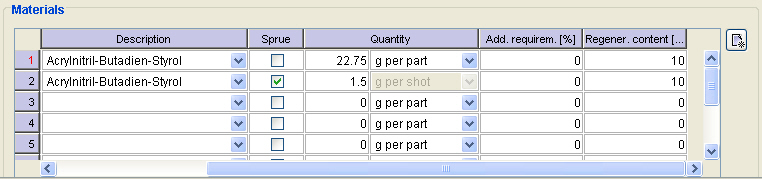
In the simplest case you have a material for which you state the required quantity per part/shot in [g]. If you are working with 'inserts', you can declare these as 'Material'. The required quantity can be specified at 'pieces per part'.
If you want to input information on the sprue, you have the choice of either entering an additional requirement [in %] in relation to the part or shot weight or by activating the "sprue" box and inputting the material requirement for the sprue separately.
If, for example, the used material is compiled of a 'basic material' and a 'batch' (of dye), you can input the material requirement for each material separately.
If a part of the material is to be reused as regenerated material in the injection process, you input the percentage in relation to the part/short weight.(Move the dialog to the right.)
Example: ABS is used as material for an item. The shot weight is 22,75g. The 'sprue' has a weight of 1,5g. 10% of the part weight and the 'sprue' per shot are supply to the injection moulding process as regenerated material.
Further materials can be added using the symbol ![]() .
.
On the 'picture' page you also have the possibility of creating a link to a picture of the item. The picture formats 'GIF', 'JPEG', 'PNG' and 'BMP' are supported. In order for this picture to be accessed by all ALS clients it must be stored on a server to which all clients have access. In the item list, items with a picture are marked with an icon in the 'external documents' column. The link to the picture is also shown in the document administration with the remark 'Master data picture'.
In the "Extra" page you can store information on the production, quality remarks, documentation, on the packaging or on the costs. This information can be found again in the 'Header data' of the orders which you generate from the item data.
All data can be changed in the dialog 'Change item'.
Here you lock/unlock items, i.e. you can inhibit them from being used, or release them again.
The 'Item info' report contains all information on a item on one page. The name of the item is also displayed as a bar code.
An item can take on the following statuses:
enabled
inhibited - it is not possible to generate an order from an inhibited item.
samples
The system queries whether you really want to delete the selected item. If you answer this question with yes, the item is erased from the database.
A new item can be generated from the data of an existing item by selecting the original item and activating the 'copy' function. In the displayed dialog you input the new item number. In 'Change item' you can undertake further changes.
In the 'Item history' you document changes made to an item. In order to ensure that the documentation always includes all necessary data, you can store a 'template' in the 'free text' area of the dialog.
For each item you can store various kinds of Dokuments, such as drawings, log book etc..